Ceiling height changes how light spreads, where fixtures must sit, and which fixture types actually work. The higher your ceiling, the more light dissipates before it reaches the surfaces where you live and work — so you need to adjust fixture type, mounting position, and layering strategy, not just swap in a brighter bulb.
Three immediate actions to take:
- Measure the vertical distance from your ceiling to the work plane (typically 30" above the floor for a table or desk).
- Match your fixture type to your ceiling height before you shop — the wrong category is the most common and most expensive mistake.
- Plan layered lighting (ambient, task, accent) before finalizing any placement, especially in rooms taller than 9 feet.
Quick rules-of-thumb by ceiling height:
- 8 feet: Flush mounts and semi-flush fixtures; keep pendants short or skip them; aim for moderate illumination at the work plane.
- 9 feet: Semi-flush or compact chandeliers work well; short pendants are viable over tables; layer with floor lamps.
- 10 feet and above: Full chandeliers, long pendants, and wall-washers become necessary; layered zoning is not optional.
Table of Contents
- How does ceiling height change the way light actually behaves?
- What fixtures work best at 8, 9, 10, and 12-foot ceilings?
- How should recessed lighting spacing change with ceiling height?
- Why do high ceilings help photographers, and what should you watch for?
- How do beam angles, dimming, and energy trade-offs factor into your plan?
- How do you calculate the lumens you actually need?
- Key Takeaways
- The detail most lighting guides skip
- LightsThings has the fixtures to match your ceiling
- Useful sources and further reading
How does ceiling height change the way light actually behaves?
Light intensity drops with distance, and that physics shapes every decision you make about fixtures. As a fixture moves farther from the work plane, its illuminance at that surface falls off — meaning a ceiling-mounted downlight in a 10-foot room delivers noticeably less usable light at desk level than the same fixture in an 8-foot room, even at identical wattage. Standard spacing guidelines designed for 8-foot ceilings underperform at taller heights precisely because of this falloff.
Ceiling and wall brightness also shape how large and how tall a room feels. Research shows that ceiling luminance and wall luminance have roughly additive effects on perceived height — a brighter ceiling makes a room feel taller, and brighter walls amplify that effect independently. This means lighting your ceiling surface, not just the floor, is a design decision with real perceptual consequences.
Glare is the third variable ceiling height controls. In a standard 8-foot room, recessed fixtures sit close to eye level and their shielding keeps them out of your direct sightline. As ceilings rise, the same fixtures become more visible from seated positions, and the glare angle shifts. Fixtures specified for standard heights can produce uncomfortable glare when mounted higher, so the lighting specification needs to match the actual ceiling height.
The fix for a tall room is rarely more lumens. Dropping the source closer to the occupied plane — with longer pendants or mid-height sconces — anchors light where people actually are and avoids the uneven brightness that makes high-ceiling rooms feel either cavernous or harshly lit.
Tall rooms also tend to go visually dark at night because traditional downlighting concentrates light on the floor and leaves upper walls and the ceiling itself unlit. Wall-washers and uplighters bring vertical surfaces into the visual field and prevent that “black hole” effect after sunset.
What fixtures work best at 8, 9, 10, and 12-foot ceilings?
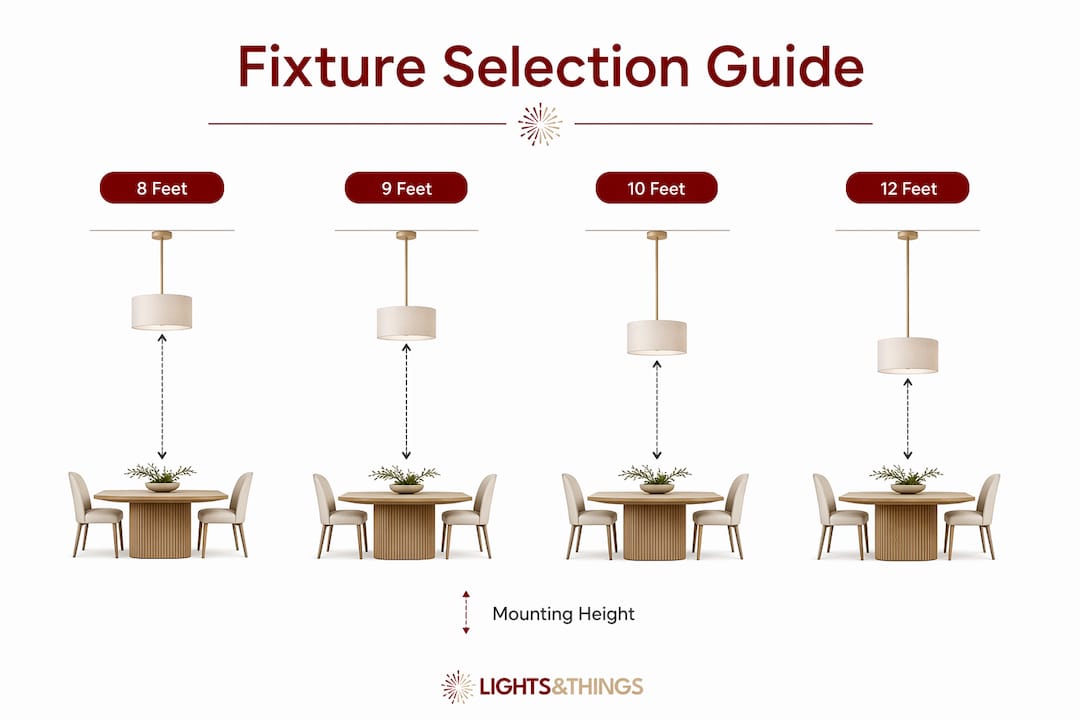
Fixture scale and selection should follow vertical scale: the fixture category that looks proportional and performs well at 8 feet will look undersized and underperform at 12 feet. The table below gives you a practical starting point.

| Ceiling Height | Recommended Fixture Types | Mounting Height | Min. Clearance | Common Pitfall |
|---|---|---|---|---|
| 8 ft | Flush mount, semi-flush | Ceiling-mounted | 7 ft from floor | Pendants hung too low; collision risk |
| 9 ft | Semi-flush, compact chandelier, short pendant | 7 ft from floor | 7 ft from floor | Fixture too small for the vertical scale |
| 10 ft | Pendant, mid-size chandelier, wall-washer | 7–8 ft from floor | 7 ft from floor | Neglecting upper walls; dark ceiling |
| 12 ft+ | Large chandelier, long pendant, uplighter | 8–9 ft from floor | 7 ft from floor | Single-source lighting; cavernous feel |
Fixture diameter matters as much as height. A common rule is to add the room’s length and width in feet, then use that sum in inches as a rough guide for chandelier diameter — a medium-sized room suggests a fixture sized proportionally. For ceiling light types that hang, vertical clearance always comes first: no fixture should hang lower than 7 feet from the floor in a traffic area, and dining pendants typically sit 30–36 inches above the table surface.
Pro Tip: Choose fixtures with adjustable stems or rod kits whenever possible. A pendant that ships with a 6-inch stem can often be extended to 24 inches or more, which means the same fixture works across a range of ceiling heights and adapts if you rearrange furniture or move to a new space.
How should recessed lighting spacing change with ceiling height?
Spacing and beam selection must change with ceiling height — a formula that works at 8 feet creates dark gaps at 10 feet. The standard starting point for 8-foot ceilings is to space recessed fixtures 4–6 feet apart and place the first fixture roughly half that distance from the wall. As ceiling height increases, widen that spacing proportionally: for a 10-foot ceiling, a 5–6 foot spacing is a reasonable starting point, but verify with a lux meter or lighting app after installation.
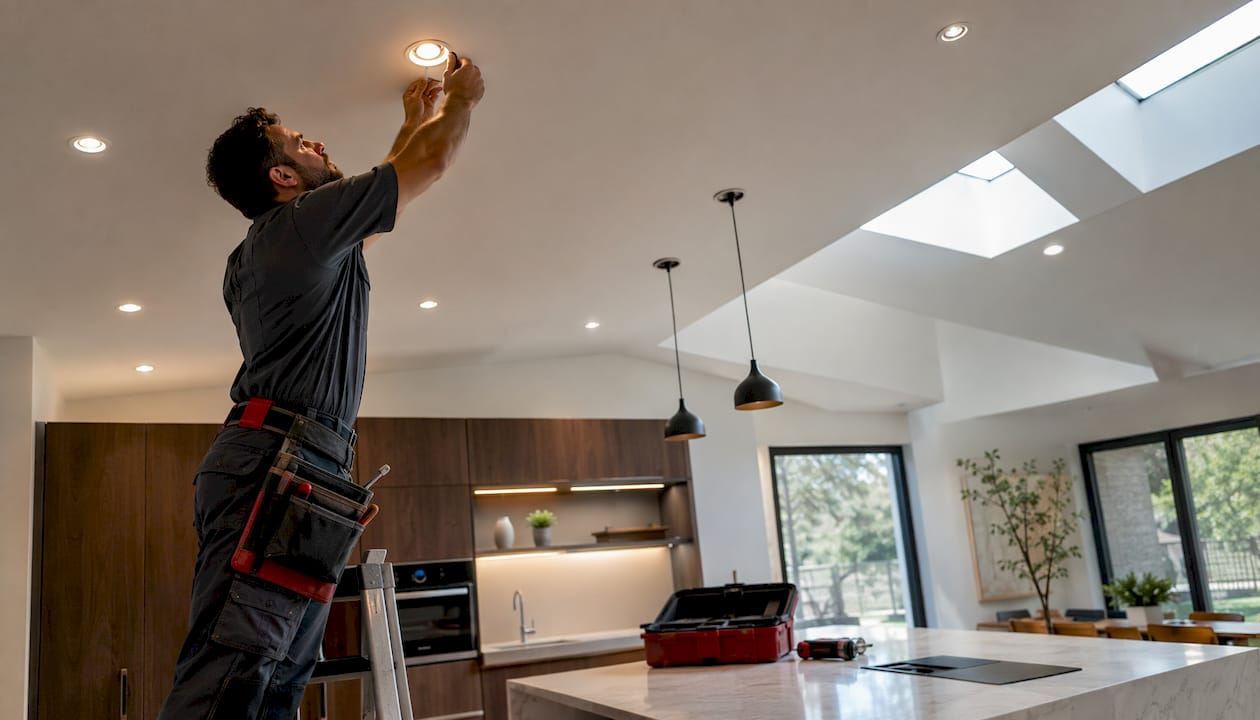
A simple spacing formula: divide the ceiling height by 2 for a starting point, but note that the standard 4–6 foot rule for recessed fixtures is reliable for 8-foot ceilings and needs adjusting for taller rooms. At ceiling heights above 8 feet, increase the spacing but verify with actual light readings — for example, start with 5–6 feet at 10 feet ceilings and check work-plane illuminance with a lux meter after installation.
Trim and beam angle choices shift with height as well:
- Narrow beam angles are best for accent lighting and art at any height, concentrating light effectively.
- Medium beams serve well for general-purpose lighting at standard heights but may need supplementing at higher ceilings.
- Wide beams work well for ambient wash at lower ceilings but may be too diffuse at taller heights.
- Adjustable gimbal or eyeball trims: Worth the upgrade whenever you need to accent artwork, shelving, or architectural features — they let you aim the beam without relocating the fixture.
Pro Tip: In rooms taller than 9 feet, mix fixed downlights with at least one row of wall-washers aimed at the vertical surfaces. This prevents the upper walls from going dark and makes the room feel finished rather than cavernous, especially in the evening.
Why do high ceilings help photographers, and what should you watch for?
High ceilings generally improve photography setups because they allow larger softboxes and deeper bounce, give you more vertical room to position modifiers, and let window daylight penetrate further into the space. Taller rooms boost vertical daylight reach and allow light to be bounced deeper into a room, which is exactly what portrait and product photographers want from a natural-light studio.
The catch is control. A high white ceiling acts as a giant reflector, filling shadows and reducing contrast. That’s useful for soft, even light, but it can flatten images when you want drama. Photographers working in tall spaces often need to lower their modifiers closer to the subject rather than rely on ceiling bounce, and they use black flags or blackback panels to block unwanted ceiling fill.
Tactics for photographers in ceiling-height-aware setups:
- Lower your key light modifier to within 3–4 feet of the subject rather than letting it bounce off a 12-foot ceiling.
- Use a black reflector or flag above the subject to cut ceiling bounce when you want contrast.
- For background illumination, mount fixtures at mid-height on the background wall rather than relying on ceiling-mounted sources.
- A lighter ceiling color increases ambient fill; a darker ceiling reduces it — paint accordingly for your typical shooting style.
Pre-shoot ceiling checklist:
- Measure ceiling height and note the color (white, off-white, dark).
- Confirm available mounting points (hooks, speed rail, ceiling grid).
- Check ladder access for adjusting overhead modifiers.
- Decide whether you want ceiling bounce or need to suppress it, and set flags before the client arrives.
How do beam angles, dimming, and energy trade-offs factor into your plan?
Plan for zones and layered control from the start — it saves energy, improves visual comfort, and gives you flexibility that a single-circuit room never has. In a tall room, a single dimmer controlling all fixtures creates either a washed-out space or a dark one; zoning lets you run ambient, task, and accent layers independently.
Research on high-ceiling lighting design confirms that ceiling downlights have the greatest overall impact on illuminance uniformity and glare rating, while low-level accent lighting and indirect lighting can reduce installed power while maintaining high efficacy through zoned design. That finding supports a practical approach: use downlights for the ambient base, then layer accent and task sources on separate circuits.
Planning checklist for beam angles, dimming, and energy:
- Assign each lighting layer (ambient, task, accent) to its own dimmer circuit.
- Use occupancy or vacancy sensors in tall rooms where lights are often left on unnecessarily.
- Choose LED sources rated for dimming compatibility — not all LED drivers dim smoothly at low levels.
- For accent lighting in tall rooms, narrow-beam LEDs (15–25°) on a separate dimmer give you precise control without spilling onto the ceiling.
Maintenance is a real cost in tall rooms. Replacing bulbs at 12 feet requires a ladder and more time than a standard 8-foot swap. Choosing long-life LED sources (rated 25,000 hours or more) reduces that burden significantly. Higher initial fixture and installation costs in tall rooms are generally offset by lower energy draw and less frequent bulb replacement over a 5–10 year horizon.
Pro Tip: Before finalizing your fixture layout, download a lux meter app (such as Lux Light Meter on iOS or Android) and take baseline readings at your work plane. Even a rough reading tells you whether your current setup is hitting a reasonable target before you commit to new fixtures.
How do you calculate the lumens you actually need?
Example result first: a 12×15-foot living room needs roughly 3,600 lumens at an 8-foot ceiling and closer to 4,500 lumens at a 10-foot ceiling to hit a comfortable 20 fc at the work plane. Here’s how to get there yourself.
The lumen method, step by step
- Measure your room area. Length × width in feet. A 12×15 room = 180 sq ft.
- Pick a target illuminance. Living rooms typically target 10–20 fc; kitchens and task areas 30–50 fc; photography studios 50–100 fc depending on the work.
- Multiply area by target fc. 180 sq ft × 20 fc = 3,600 lumens needed at the work plane.
- Apply a height adjustment factor. For ceiling heights above a typical standard, increase your lumen target to compensate for light falloff due to increased height. At 10 feet: 3,600 × 1.25 = 4,500 lumens.
- Divide by fixture output. If each recessed fixture delivers 800 lumens, you need about 5–6 fixtures at 8 feet and 6–7 at 10 feet for this room.
Two quick examples
| Scenario | Room | Ceiling | Target fc | Lumens needed | Fixtures (800 lm each) |
|---|---|---|---|---|---|
| Living room | 12×15 ft | 8 ft | 20 fc | ~3,600 lm | ~5 |
| Living room | 12×15 ft | 10 ft | 20 fc | ~4,500 lm | ~6 |
| Small photo studio | 10×12 ft | 10 ft | — | — | — |
For the living room lighting scenario, these numbers represent the ambient layer only — task and accent sources add to the total. For a photography studio, high-output continuous lights or strobes typically replace residential fixtures, but the area-times-fc math still tells you the target.
Quick planning checklist:
- Measure room dimensions and ceiling height.
- Pick your target fc by room function.
- Multiply area × fc, then apply the height adjustment.
- Divide by fixture lumen output to get fixture count.
- Verify with a lux meter app after installation and adjust dimmer levels.
Key Takeaways
Ceiling height determines fixture type, mounting position, lumen requirements, and layering strategy — getting it right from the start prevents the most common and costly lighting mistakes.
| Point | Details |
|---|---|
| Match fixture type to height | Use flush/semi-flush at 8 ft, compact chandeliers at 9 ft, and full pendants or chandeliers at 10 ft and above. |
| Adjust lumens for falloff | Increase your lumen target by about 25% for each 2 feet of ceiling height above 8 feet to compensate for light falloff. For example, an 8-foot ceiling might require 3,600 lumens, while a 10-foot ceiling would need about 4,500 lumens for the same room and target illuminance. |
| Layer and zone your lighting | Assign ambient, task, and accent layers to separate dimmer circuits, especially in rooms taller than 9 feet. |
| Photographers need height control | High ceilings allow larger modifiers but require lowered sources and flags to maintain contrast and background separation. |
| LightsThings fixtures by height | LightsThings carries flush mounts, adjustable pendants, and statement chandeliers sized for 8-foot to 12-foot-plus ceilings. |
The detail most lighting guides skip
Most articles on ceiling height and lighting stop at fixture categories and lumen math. What they understate is the perceptual dimension: ceiling luminance has a stronger effect on perceived room height than hue or saturation, which means a well-lit ceiling does more for how a room feels than almost any paint color choice. Designers who obsess over wall color while leaving the ceiling dark are solving the wrong problem.
The other overlooked point is that “higher is better” is a cognitive bias, not a design principle. Research summarized by StudioMatrx shows that higher ceilings prime abstract thinking while lower ceilings support detail-oriented focus. A photography studio or creative workspace genuinely benefits from vertical volume. A home office where you need to concentrate on spreadsheets may not. Ceiling height should follow function, and so should the lighting strategy built around it.
The practical takeaway: before you order fixtures, decide what the room is actually for. Then choose ceiling height, fixture type, and layering strategy together, not as three separate decisions. That integration is where most residential lighting plans fall apart, and it’s the gap that separates a room that looks good in photos from one that feels right to live in.
LightsThings has the fixtures to match your ceiling
Whether you’re working with a cozy 8-foot ceiling or a dramatic 12-foot great room, the right fixture makes the difference between a space that feels complete and one that never quite comes together. LightsThings carries ceiling lighting across every category covered in this guide — flush mounts for low ceilings, adjustable pendants for mid-height rooms, and statement chandeliers like the Crystal Chandelier Double Helix designed specifically for tall, open spaces.
Every purchase comes with free shipping on qualifying orders, easy returns, and price matching, so you can shop with confidence. If you want to go deeper on fixture selection before you buy, the LightsThings decorative lighting buying guide walks you through style, scale, and room-by-room recommendations. Browse the full ceiling lighting collection and find the fixture that fits your ceiling, your room, and your style.
Useful sources and further reading
- Surface lightness influences perceived room height — PubMed, peer-reviewed study on ceiling and wall luminance effects on perceived height.
- Bright paint makes interior-space surfaces appear farther away — PMC, Oberfeld et al. on luminance and perceived spatial extent.
- Which Attribute of Ceiling Color Influences Perceived Room Height? — Castell, Oberfeld & Hecht (2018), on ceiling luminance vs. hue and saturation.
- The Ceiling Height Rule That Changes Everything About Your Lighting — ELCO Lighting, practical spacing and fixture guidance.
- Ceiling Height Lighting Rules: 8ft vs 9ft vs 10ft — Randy Lemmon, fixture scale and selection by height.
- The Science of Ceiling Heights — StudioMatrx, cognitive and environmental effects of ceiling height.
- How Ceiling Height Influences Creativity and Focus — Neurotectura, ceiling height and abstract vs. concrete thinking.
- How to Select Lighting for High Ceilings That Works — LightsThings, product-focused guidance for tall-ceiling fixtures.
- How to Design Ceiling Lighting That Works — LightsThings, layering and placement design guide.
- 5 Ways to Style Porcelain Tealight Holders for Ambient Evening Lighting — MySpinShop, ambient accent lighting ideas for any ceiling height.